How to add WordPress...
How to add WordPress products and prices
How to add WordPress products and prices
Adding products and prices to a WordPress website can be easily done using a plugin like WooCommerce, which is the most popular and powerful tool for setting up an online store on WordPress. Here’s a step-by-step guide on how to add products and prices using WooCommerce:
Step 1: Install and Activate WooCommerce
- Login to your WordPress dashboard.
- Go to Plugins > Add New.
- Search for WooCommerce in the search bar.
- Click Install Now on the WooCommerce plugin, then click Activate once it’s installed.
- Follow the setup wizard to configure basic settings like store location, currency, payment methods, and shipping options.
Step 2: Add a New Product
Once WooCommerce is installed, you can start adding products:
- In the WordPress dashboard, go to Products > Add New.
- Enter the Product Name in the title field.
- Add a detailed Description in the text area below the product name.
Step 3: Set Product Data and Price
Below the description, you’ll see the Product Data section, where you can configure product settings like price, stock, and shipping.
- In the General tab:
- Regular Price: Set the normal price of the product.
- Sale Price: If applicable, set a discounted price for the product.
- You can also schedule sales by clicking Schedule and selecting start and end dates for the sale price.
- If it’s a Simple Product (one without variations), you can also fill out:
- SKU (optional): A unique product identifier.
- Stock Status: Manage stock for the product if you have inventory.
- For Variable Products (e.g., different sizes or colors), you need to:
- Go to the Attributes tab, create custom attributes like size or color, and mark the “Used for variations” box.
- After setting up attributes, go to the Variations tab and create individual product variations. You can set different prices for each variation here.
Step 4: Add Product Short Description, Categories, and Tags
- Product Short Description: Add a brief description that will appear on the product page next to the product image.
- Product Categories: Assign the product to one or more categories, which helps organize your store.
- Product Tags: Add tags to help customers find your product.
Step 5: Add Product Images
- Product Image: Upload a main image that represents the product.
- Product Gallery: Add multiple images for the product gallery (optional).
Step 6: Publish the Product
Once everything is set, click the Publish button to make the product live on your website.
Optional: Customize Product Pages
- You can customize the layout and design of your product pages using WordPress themes and page builders like Elementor or custom CSS for a more tailored look.
Step 7: View and Manage Products
- To view your products, go to the Products > All Products page. Here you can see all the products you’ve added and manage them by editing, deleting, or viewing stock levels.
Conclusion
With WooCommerce, adding products and prices to a WordPress website is straightforward. By following these steps, you can create a professional online store with customizable product listings and pricing options.
Method 2
There is however default method to add products with WordPress
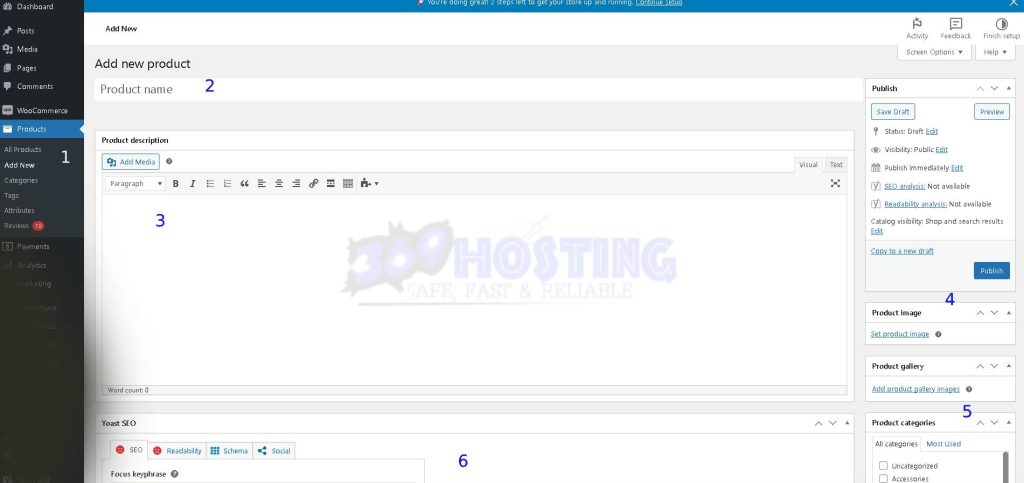
By following the steps in the image from step 1 up to 6 where you optimize product for SEO you will be able to upload well defined product to your store.
Happy product uploading with ease!!!